
Generally, the more external systems your codebase relies on, the more complex your testing is likely to be. A good example of this is databases. Many applications depend on external databases to store data, making them crucial to the application’s functionality.
Traditionally, when it’s time to test code that depends on these external services, practices like Inversion Of Control and Dependency Injection allow code to be written so that adapters for these services can be swapped out during testing with mocked adapters that implement the same interface. This works well for unit tests that are only concerned with the functionality of the code under test, but it leaves something to be desired in terms of confidence in the overall application.
Testcontainers offers an alternative solution to this problem. It’s a library that allows you to create lightweight Docker containers from within your test code. This means that you can create real instances of Postgres, MySQL, Redis, or anything else that can run in a Docker container, and you can use these purpose-built containers for your tests. This makes integration testing much easier as you no longer need to orchestrate dependency containers externally.
Testcontainers supports a number of languages officially, with libraries for Java, Node, Rust, Python, and others as well as unofficial community libraries for other languages such as PHP. The Node.js version of Testcontainers has excellent TypeScript support. Everything is fully typed, making it a joy to use in TypeScript applications.
In this tutorial, you will see how Testcontainers can be leveraged with TypeScript to create a simple application with integration tests that run in real Docker containers created by your tests. You will also see how this can be used to test your application against different databases, such as MySQL and PostgreSQL.
Initial Setup
To use Testcontainers for Node, you need to have:
- Any of the [Supported container runtimes].
- Node.js and npm
- A code editor (VS Code is a good choice if you don’t have a preference)
The full source code for this tutorial can be found in this GitHub Repository.
To set up your project from scratch, start by creating a new directory to contain this tutorial’s code and navigate into it:
mkdir node-ts-testcontainers
cd node-ts-testcontainers
Next, install a few npm dependencies by running the following command:
npm init --yes
npm install typescript jest @types/jest ts-jest sequelize mysql2 pg pg-hstore testcontainers @testcontainers/postgresql @testcontainers/mysql
These dependencies are responsible for the following:
- typescript: Allows you to take advantage of proper types when working with JavaScript
- jest: The test runner you’ll use to execute your tests
- @types/jest: Type definitions for Jest in TypeScript
- ts-jest: Allows Jest to run your TypeScript test files without the need to transpile them manually
- testcontainers: allows you to create general purpose Docker containers from within your application or tests
- @testcontainers/postgresql: PostgreSQL container module for Testcontainers
- @testcontainers/mysql: MySQL container module for Testcontainers
- sequelize: A TypeScript-friendly database object-relational mapper (ORM) you’ll use to interact with some containers
- pg and pg-hstore: Drivers for Postgres connections in Sequelize
- mysql2: Driver for MySQL connections in Sequelize
With these dependencies installed, you also need to add some configuration files for TypeScript and Jest. You can create typescript configuration file, tsconfig.json, using following command:
npx tsc --init
Next, create Jest config file, jest.config.js, in the root of your project directory using the following command:
npx ts-jest config:init
Finally, open your package.json and add the following snippet:
"scripts": {
    "test": "jest"
},
With that, you should have everything you need to start writing some tests that can leverage Testcontainers.
Writing Tests with Testcontainers
Before writing a test, you need some code to validate. You’ll use Sequelize—an ORM that supports different types of SQL databases, including MySQL and PostgreSQL. You’ll then see how Testcontainers allows you to run code against different real databases without having to spend much time writing code from scratch that respects the (often subtle) differences between SQL dialects.
Create a new file called src/sequelize.ts and give it the following content:
import { Sequelize, DataTypes, Dialect } from "sequelize";

type GetSequelizeArgs = {
  database: string;
  username: string;
  password: string;
  host: string;
  port: number;
  dialect: Dialect;
};

export async function getSequelize({
  database,
  username,
  password,
  host,
  port,
  dialect,
}: GetSequelizeArgs) {
  // Create the client
  const client = new Sequelize(database, username, password, {
    host,
    dialect,
    port,
    logging: false,
  });

  // Define a model
  const User = client.define("User", {
    firstName: {
      type: DataTypes.STRING,
      allowNull: false,
    },
    lastName: {
      type: DataTypes.STRING,
    },
  });

  // Make sure the table exists
  await User.sync();

  // Return the client and model
  return { client, User };
}
This fairly contrived code first creates an instance of the Sequelize client with the values you provide and then creates and migrates a simple model.
Next, you’ll create a simple test for this code. Create a file called src/sequelize.test.ts and give it the following content:
import { PostgreSqlContainer } from "@testcontainers/postgresql";
import { getSequelize } from "./sequelize";

describe("should connect and return a query result", () => {
  it("works with postgres", async () => {
    // Create a container using testcontainers
    const container = await new PostgreSqlContainer().start();

    // Use the details from the container, create the database client
    const { client, User } = await getSequelize({
      database: container.getDatabase(),
      username: container.getUsername(),
      password: container.getPassword(),
      host: container.getHost(),
      port: container.getPort(),
      dialect: "postgres",
    });

    // Check if you have access to the database
    await client.authenticate();

    // Create a user
    await User.create({
      firstName: "John",
      lastName: "Hancock",
    });

    // Get all users
    const users = await User.findAll();

    // Check that the expected user is present
    expect(users).toEqual(
      expect.arrayContaining([
   	 expect.objectContaining({
 		 firstName: "John",
 		 lastName: "Hancock",
 		 id: 1,
 		 createdAt: expect.any(Date),
 		 updatedAt: expect.any(Date),
   	 }),
      ])
    );

    // Close connections
    await client.close();
    await container.stop();
  }, 25000);
});
As you can see from the comments, this code uses Testcontainers to create and start a container during the test. The details of that container are then provided to your getSequelize() function so that the ORM knows how to connect to the database. The rest of the test checks that the connection to the database is valid and that a user record can be created and read from the database successfully.
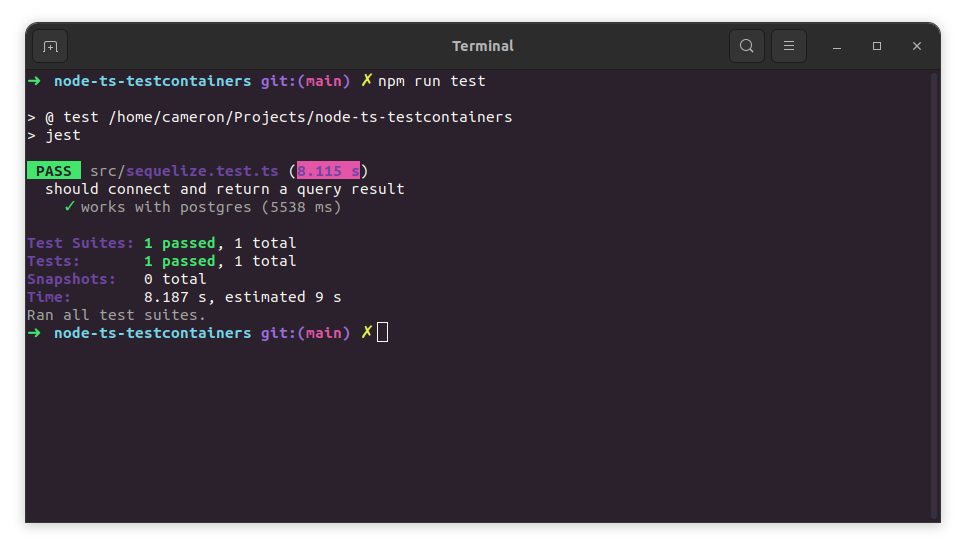
To verify that this test works, run the following command from the terminal:
npm run test
The output you see should look something like the screenshot below, indicating that your test has passed:
Traditionally, tests like this would have required that you either create the container in advance or use mocks instead of an actual database. Both of these approaches have drawbacks.
Creating the container in advance, or otherwise using an externally managed real database, increases the complexity of the tests and makes them more complicated to run.
Using mocks risks you missing out on any nuance these external systems introduce. Because it results in tests that are not representative of how the code will run in production, your tests cannot be relied upon to verify that the system works as a whole with a high degree of confidence.
While mocking is typically fine for unit tests, integration tests often call for real dependencies like databases, for which Testcontainers is an excellent fit.
Testing against Different Databases
One benefit of running Docker containers in your tests is that you can quickly and easily swap out containers to test different situations. Consider a scenario where you might want to change from Postgres to MySQL. It would be crucial to ensure that your code runs correctly with this different database dependency.
With Testcontainers, validating this assertion is as simple as creating a different container.
First, update the testcontainers import in src/sequelize.test.ts to also include MySqlContainer:
-import { PostgreSqlContainer } from "@testcontainers/postgresql";
+import { MySqlContainer } from "@testcontainers/mysql";
Next, below the existing it(...) statement in src/sequelize.test.ts, add the following test:
it("works with mysql", async () => {
    // Create a container using testcontainers
    const container = await new MySqlContainer().start();

    // Use the details from the container, create the database client
    const { client, User } = await getSequelize({
      database: container.getDatabase(),
      username: container.getUsername(),
      password: container.getUserPassword(),
      host: container.getHost(),
      port: container.getPort(),
      dialect: "mysql",
    });

    await client
      .authenticate()
      .then(() => {
   	 console.log("Connection has been established successfully.");
      })
      .catch((error) => {
   	 console.error("Unable to connect to the database: ", error);
      });

    // Check if you have access to the database
    const auth = await client.authenticate();

    // Create a user
    await User.create({
      firstName: "John",
      lastName: "Hancock",
    });

    // Get all users
    const users = await User.findAll();

    // Check that the expected user is present
    expect(users).toEqual(
      expect.arrayContaining([
   	 expect.objectContaining({
 		 firstName: "John",
 		 lastName: "Hancock",
 		 id: 1,
 		 createdAt: expect.any(Date),
 		 updatedAt: expect.any(Date),
   	 }),
      ])
    );

    // Close connections
    await client.close();
    await container.stop();
  }, 25000);
This test is largely the same as the first but has a few key differences.
Firstly, it uses the MySqlContainer export from Testcontainers instead of the PostgreSqlContainer export. Secondly, the dialect option passed to the getSequelize() function specifies that the client should expect to communicate with a MySQL server.
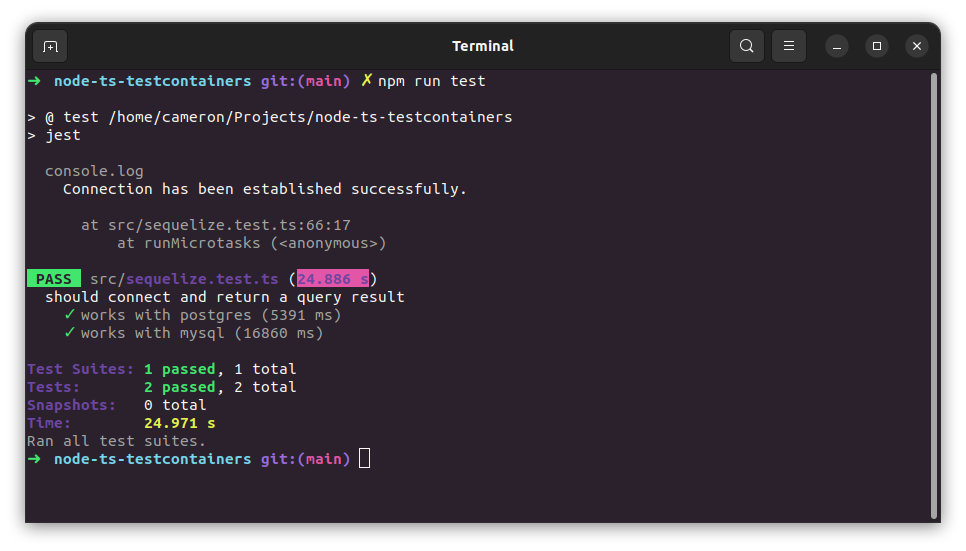
Rerun your tests, and you should see that both now pass, validating that your code works with Postgres and MySQL.
Using Generic Testcontainers
Databases are not the only thing that you can run with Testcontainers. The library exposes the ability to create arbitrary containers. Consider this example from the official docs:
const { GenericContainer } = require("testcontainers");
const container = await new GenericContainer("alpine").start();
This would create a container running the alpine image. It’s not terribly useful on its own, but this approach can be used with any Docker image. This means you can run Redis instances, databases, Selenium web browsers, or instances of your own internal applications.
Testcontainers exposes a number of helpful builder methods like withCommand and withEnvironment that allow you to define the parameters of the containers that you need, like so:
const container = await new GenericContainer("alpine")
  .withEnvironment({ ENV: "VALUE" })
  .withCommand([‘sleep’, ‘infinity’])
  .start();
This makes Testcontainers virtually infinitely flexible. It’s capable of facilitating just about any use case you might have that could otherwise be solved with normal Docker containers.
Summary
This tutorial introduced you to Testcontainers, a powerful cross-language library that allows you to run Docker containers from within your tests. It allows you to instantiate containers to satisfy any external dependencies that your app might have, greatly simplifying and streamlining the process of writing integration tests. It’s especially useful for tests that would benefit from real databases or any other services that you can run in a Docker container.
Be sure to try Testcontainers for your next Typescript project. And if you want to learn more about it, you’ll find excellent documentation and guides on how to use it with Java, Node, Python, Rust, and many other languages on the official site.
by Cameron Pavey
Cameron is a full-stack dev living and working in Melbourne. He’s committed himself to the never-ending journey of understanding the intricacies of quality code, developer productivity, and job satisfaction.
