
Quality assurance (QA) plays a crucial role in the software development process, with testing at its core. And when it comes to testing, developers primarily focus on two types of tests: integration and unit tests.
Unit tests are straightforward, examining individual software components in isolation, while integration tests are more complex and verify how various components work together.
Writing effective integration tests can be challenging as they require a fully functioning system for testing. For instance, to test database operations, a running database is necessary. Developers often resort to using mock components or in-memory alternatives, but this approach can blur the line between integration and unit tests, potentially compromising their reliability and potentially yielding false positives.
This is precisely where Testcontainers can help. Testcontainers is a versatile framework that provides containerized system instances for your test environment. It seamlessly integrates with Quarkus and Micronaut, enhancing the local development loop by providing a consistent testing environment.
In this article, you’ll learn all about Testcontainers and how to use it to automatically create environments so that you can run and test your code without any variability in software.
An Introduction to Testcontainers, Quarkus, and Micronaut
Testcontainers simplifies testing by letting you create and use systems like databases or message brokers within Docker containers. For instance, you can use Testcontainers to run a database in a container and conduct tests on data storage.
Testcontainers plays a pivotal role in providing a dependable test environment for running tests on real systems. This, in turn, enhances test coverage and increases developers’ confidence in the accuracy of their test results.
Testcontainers supports multiple languages, including Java, Go, and Python. And as previously mentioned, some frameworks, like Quarkus and Micronaut, integrate Testcontainers into their developer models, streamlining development and testing workflows.
Quarkus is a Java framework and is a Jakarta EE MicroProfile implementation for cloud-native software development and you can use Quarkus with Apache Groovy, and Kotlin as well. Quarkus claims to be Kubernetes-native and provides built-in support for GraalVM.
Similarly, Micronaut is another Java framework and a MicroProfile implementation. Additionally, it’s a Java virtual machine (JVM)–based framework that empowers developers to build cloud-native software. Its polyglot structure not only supports Java but also extends compatibility to Apache Groovy, and Kotlin.
Both Quarkus and Micronaut incorporate Testcontainers into their development process. Quarkus offers Dev Services using Testcontainers as its service backend. This enables developers to run integration tests effortlessly without having to worry about configuring a service backend.
Similarly, Micronaut provides Test Resources utilizing Testcontainers. Test Resources encompasses various modules for relational databases; message brokers, such as RabbitMQ; and NoSQL databases, such as MongoDB. Like the Quarkus Dev Services, the Micronaut Test Resources ensures a seamless developer experience, streamlining the testing process.
To help you better understand how Testcontainers, Quarkus, and Micronaut interact, this tutorial will walk you through the implementation of tests using Testcontainers in a Quarkus and Micronaut project. So let’s get started!
Using Testcontainers with Quarkus and Micronaut
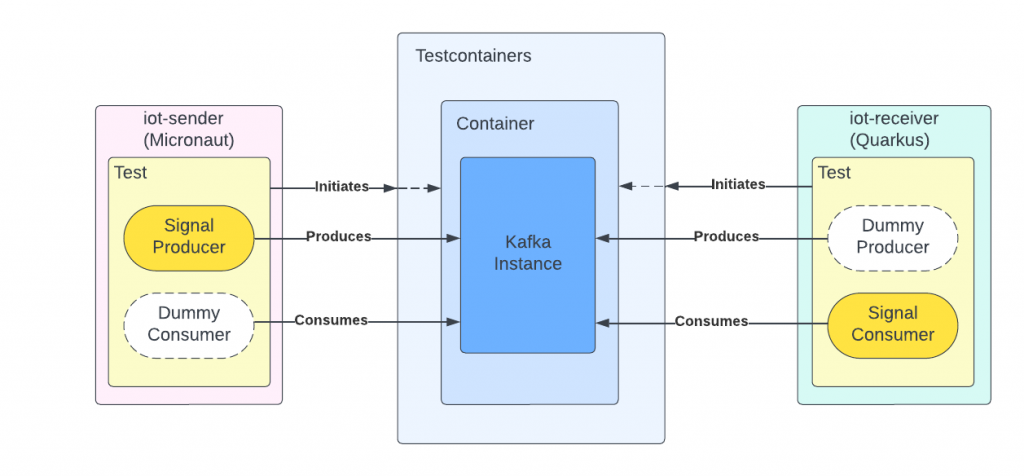
In this scenario, let’s assume that you’re working for an Internet of Things (IoT) company. This company prototyped two types of devices for sending and receiving signals:
the sender device, which uses a backend service called iot-sender and is based on the Micronaut framework, and the receiver device, which has a backend service called iot-receiver based on the Quarkus framework.
Ideally, the signal communication should go through a Kafka broker, the iot-sender service should send the signals to the Kafka broker, and the iot-receiver should collect the signals.
However, because these devices are prototypes, the company doesn’t have the proper infrastructure, which means there is no Kafka broker instance running.
But before paying for the infrastructure, the company wants to test the devices, which is what you’ll be doing here. The final solution looks like this:
Prerequisites
Before you begin this tutorial, make sure you have the following:
- Java 17+
- A Docker environment supported by Testcontainers https://www.testcontainers.org/supported_docker_environment/
You can run git clone https://github.com/testcontainers-community/testcontainers-quarkus-micronaut-demo to clone the source code for this demo.
Implement the Test for the IoT Receiver Application
To utilize Testcontainers in the Quarkus-based receiver application, you need to use the Quarkus Dev Services. While there’s no need for additional Testcontainers configuration, you should specify certain Kafka configuration parameters within the application.properties file of the iot-receiver application.
In an IDE of your choice, open the cloned project testcontainers-quarkus-micronaut-demo and navigate to apps/iot-receiver/src/main/resources. Open the application.properties file and add the following lines under the TODO line:
%test.mp.messaging.outgoing.signals-out.connector=smallrye-kafka
%test.mp.messaging.outgoing.signals-out.topic=signals
%test.mp.messaging.outgoing.signals-out.key.serializer=org.apache.kafka.common.serialization.StringSerializer
%test.mp.messaging.outgoing.signals-out.value.serializer=com.systemcraftsman.demo.serde.SignalSerializer
For more information on Kafka and its usage in Quarkus, check out this reference guide.
In order to test that the signal was received, you need to define an outgoing channel, which sends the signals for testing. These test configurations define the connector type for the outgoing channel named signals-out and define the Kafka topic’s name where the signals are sent. Additionally, these configurations define the key and value serializers for the signal data, ensuring that the signal undergoes the transformation into a byte array before being transmitted to Kafka.
Quarkus runs its Dev Services for Kafka by checking if there is a kafka.bootstrap.servers definition in the application.properties file. You can see that there is a definition for dev, but kafka.bootstrap.servers isn’t defined for the test environment. This means that if you run your application in a dev environment, you need a Kafka broker instance running. However, for your tests, Dev Services spins up a Kafka broker for you using Testcontainers.
In order to implement a test for the iot-receiver, navigate to the Java test class com.systemcraftsman.demo.IotReceiverTest under the src/main/test directory of the application. Then add the following content in the IotReceiverTest class:
@Inject
@Channel("signals-out")
Emitter<Signal> signalEmitter;

@Test
public void testReceive() throws InterruptedException {
    Signal signal = new Signal();
    signal.setDate(Calendar.getInstance().getTime());
    signal.setTemperature("35 C");
    signalEmitter.send(signal);

    Signal consumedSignal = SignalKeeper.getSignals().poll(5, TimeUnit.SECONDS);
    Assertions.assertEquals(signal.toString(), consumedSignal.toString());
}
This code injects the signalEmitter, which is a producer for testing purposes. Notice that the channel signals-out is the one that you add a configuration to in the application.properties file.
The testReceive() method creates a sample Signal object and uses the signalEmitter to send the signal to the Kafka broker. Then you call the SignalKeeper static class to get the signals and assert if it has the expected signal value.
The SignalKeeper is a simple class that stores the signals in its memory. Please note that this is not ideal and is only implemented for the purposes of this tutorial. As a better alternative, you can set up a database and store your data there.
If you navigate to com.systemcraftsman.demo.SignalConsumer under src/main/java, you’ll see that the consumer reads the messages from the signals channel. The consumer class consumes the messages from the signals topic and then adds them to the SignalKeeper storage.
Verify that the consumer mechanism works by running the test you’ve added. Make sure that your Docker is up and running. Then in the main directory of the iot-receiver, run the following command:
./mvnw clean test
Your output should look like this:
... output omitted ...
[INFO] Using auto detected provider org.apache.maven.surefire.junitplatform.JUnitPlatformProvider
[INFO]
[INFO] -------------------------------------------------------
[INFO]  T E S T S
[INFO] -------------------------------------------------------
[INFO] Running com.systemcraftsman.demo.IotReceiverTest
2023-09-06 11:53:02,304 INFO  [org.tes.doc.DockerClientProviderStrategy] (build-11) Loaded org.testcontainers.dockerclient.UnixSocketClientProviderStrategy from ~/.testcontainers.properties, will try it first
2023-09-06 11:53:02,360 WARN  [org.tes.doc.DockerClientProviderStrategy] (build-11) DOCKER_HOST tcp://127.0.0.1:62596 is not listening
2023-09-06 11:53:02,751 INFO  [org.tes.doc.DockerClientProviderStrategy] (build-11) Found Docker environment with local Unix socket (unix:///var/run/docker.sock)
2023-09-06 11:53:02,754 INFO  [org.tes.DockerClientFactory] (build-11) Docker host IP address is localhost
2023-09-06 11:53:02,784 INFO  [org.tes.DockerClientFactory] (build-11) Connected to docker:
  Server Version: 24.0.2
  API Version: 1.43
  Operating System: Docker Desktop
  Total Memory: 7859 MB
2023-09-06 11:53:02,800 INFO  [org.tes.uti.ImageNameSubstitutor] (build-11) Image name substitution will be performed by: DefaultImageNameSubstitutor (composite of 'ConfigurationFileImageNameSubstitutor' and 'PrefixingImageNameSubstitutor')
2023-09-06 11:53:02,806 INFO  [org.tes.DockerClientFactory] (build-11) Checking the system...
2023-09-06 11:53:02,807 INFO  [org.tes.DockerClientFactory] (build-11) ✔︎ Docker server version should be at least 1.6.0
2023-09-06 11:53:03,019 INFO  [tc.doc.io/.3.4] (build-11) Creating container for image: docker.io/vectorized/redpanda:v22.3.4
2023-09-06 11:53:03,638 INFO  [org.tes.uti.RegistryAuthLocator] (build-11) Credential helper/store (docker-credential-desktop) does not have credentials for docker.io
2023-09-06 11:53:03,651 INFO  [tc.tes.5.1] (build-11) Creating container for image: testcontainers/ryuk:0.5.1
2023-09-06 11:53:04,061 INFO  [tc.tes.5.1] (build-11) Container testcontainers/ryuk:0.5.1 is starting: 7f3574d5402f49766b62a2300b4aeee3f1dc4bc9d99962f25cf9bc4deedc40a5
2023-09-06 11:53:04,793 INFO  [tc.tes.5.1] (build-11) Container testcontainers/ryuk:0.5.1 started in PT1.143056S
2023-09-06 11:53:05,078 INFO  [tc.doc.io/.3.4] (build-11) Container docker.io/vectorized/redpanda:v22.3.4 is starting: 7c861bf053b6220f6c9dacfd5edcf710f097cac87d5698185fa0ffc18bf35e6f
2023-09-06 11:53:07,162 INFO  [tc.doc.io/.3.4] (build-11) Container docker.io/vectorized/redpanda:v22.3.4 started in PT4.347439S
2023-09-06 11:53:07,163 INFO  [io.qua.kaf.cli.dep.DevServicesKafkaProcessor] (build-11) Dev Services for Kafka started. Other Quarkus applications in dev mode will find the broker automatically. For Quarkus applications in production mode, you can connect to this by starting your application with -Dkafka.bootstrap.servers=OUTSIDE://localhost:32769
2023-09-06 11:53:08,196 INFO  [io.sma.rea.mes.kafka] (main) SRMSG18229: Configured topics for channel 'signals': [signals]
2023-09-06 11:53:08,731 INFO  [io.sma.rea.mes.kafka] (smallrye-kafka-producer-thread-0) SRMSG18258: Kafka producer kafka-producer-signals-out, connected to Kafka brokers 'OUTSIDE://localhost:32769', is configured to write records to 'signals'
2023-09-06 11:53:08,798 INFO  [io.sma.rea.mes.kafka] (smallrye-kafka-consumer-thread-0) SRMSG18257: Kafka consumer kafka-consumer-signals, connected to Kafka brokers 'OUTSIDE://localhost:32769', belongs to the 'iot-receiver' consumer group and is configured to poll records from [signals]
2023-09-06 11:53:08,949 INFO  [io.quarkus] (main) iot-receiver 1.0.0-SNAPSHOT on JVM (powered by Quarkus 3.3.0) started in 8.730s. Listening on: http://localhost:8081
2023-09-06 11:53:08,950 INFO  [io.quarkus] (main) Profile test activated.
2023-09-06 11:53:08,950 INFO  [io.quarkus] (main) Installed features: [cdi, kafka-client, resteasy-reactive, smallrye-context-propagation, smallrye-reactive-messaging, smallrye-reactive-messaging-kafka, vertx]
2023-09-06 11:53:13,432 INFO  [io.sma.rea.mes.kafka] (vert.x-eventloop-thread-3) SRMSG18256: Initialize record store for topic-partition 'signals-0' at position -1.
[INFO] Tests run: 1, Failures: 0, Errors: 0, Skipped: 0, Time elapsed: 14.04 s -- in com.systemcraftsman.demo.IotReceiverTest
2023-09-06 11:53:14,443 INFO  [io.sma.rea.mes.kafka] (smallrye-kafka-consumer-thread-0) SRMSG18224: Executing consumer revoked re-balance listener for group 'iot-receiver'
2023-09-06 11:53:14,481 INFO  [io.quarkus] (main) iot-receiver stopped in 1.014s
[INFO]
[INFO] Results:
[INFO]
[INFO] Tests run: 1, Failures: 0, Errors: 0, Skipped: 0
[INFO]
[INFO] ------------------------------------------------------------------------
[INFO] BUILD SUCCESS
[INFO] ------------------------------------------------------------------------
[INFO] Total time:  22.562 s
[INFO] Finished at: 2023-09-06T11:53:14+03:00
[INFO] ------------------------------------------------------------------------
Notice that Testcontainers uses Docker to start a Kafka instance and runs the test against that instance.
In this test, you verified that your dummy signal is received by your SignalConsumer class.
For the Kafka instance, Quarkus uses Redpanda by default. However, you can change this to native Kafka or Strimzi if you prefer. To do so, just add a quarkus.kafka.devservices.provider configuration in your application.properties file and set it as kafka-native or strimzi. For instance, the following configuration sets the Kafka provider as Strimzi:
quarkus.kafka.devservices.provider=strimzi
Quarkus provides configuration flexibility for the services under its Dev Services, which makes it easy to configure the Testcontainers containers and the services running in them. For more information, check out this Dev Services guide from Quarkus.
Implement the Test for the IoT Sender Application
In this section, you’ll learn how to implement your customer environment for Testcontainers for the sender application on Micronaut.
In your IDE of choice, navigate to the iot-sender application. Under the src/main/test directory, open the com.systemcraftsman.demo.AbstractKafkaTest class. Notice that the class has not yet been implemented. Add the following content to the class:
static protected final KafkaContainer MY_KAFKA =
    new KafkaContainer(DockerImageName.parse("confluentinc/cp-kafka:7.5.0"));

@Override
public Map<String, String> getProperties() {
   if (!MY_KAFKA.isRunning()) {
       MY_KAFKA.start();
   }
   return Collections.singletonMap(
       "kafka.bootstrap.servers", MY_KAFKA.getBootstrapServers()
   );
}
This code defines a Kafka container called MY_KAFKA and runs it. The code also sets up the server address kafka.bootstrap.servers value dynamically by overriding the TestPropertyProvider interface’s getProperties() method.
Setting the broker address is important because even if you normally have a static broker address for a Kafka cluster, in Testcontainers, it’s dynamically defined. This means you need to set the broker address dynamically by overriding the getProperties() method.
Now that the AbstractKafkaTest class is ready to be used, open the com.systemcraftsman.demo.IotSenderTest class and add the following content:
@Inject
private SignalProducerClient producerClient;

@Test
public void testSend() throws InterruptedException {
    Signal signal = new Signal();
    signal.setDate(Calendar.getInstance().getTime());
    signal.setTemperature("35 C");
    producerClient.sendSignal(signal);

    Signal consumedSignal = SignalKeeper.getSignals().poll(5, TimeUnit.SECONDS);
    Assertions.assertEquals(signal.toString(), consumedSignal.toString());
}
Notice that the test class extends the AbstractKafkaTest, which makes it possible to use the Testcontainers Kafka instance within the IotSenderTest test class.
This code injects the SignalProducerClient, which sends the signals to Kafka and is what you’ll be testing.
The test creates a Signal object and sends it to the Kafka topic called signals using the producerClient. Similar to the iot-receiver application, there is a class called SignalKeeper, which stores the signal data as the Kafka consumer adds signals to it. In iot-sender, the Kafka consumer is the com.systemcraftsman.demo.SignalListener class, which helps you receive and test the signal data.
Run the test by executing the following command:
./mvnw clean test
Your output should look like this:
... output omitted ...
[INFO] Using auto detected provider org.apache.maven.surefire.junitplatform.JUnitPlatformProvider
[INFO]
[INFO] -------------------------------------------------------
[INFO]  T E S T S
[INFO] -------------------------------------------------------
[INFO] Running com.systemcraftsman.demo.IotReceiverTest
2023-09-07 00:09:43,650 INFO  [org.tes.doc.DockerClientProviderStrategy] (build-4) Loaded org.testcontainers.dockerclient.UnixSocketClientProviderStrategy from ~/.testcontainers.properties, will try it first
2023-09-07 00:09:43,686 WARN  [org.tes.doc.DockerClientProviderStrategy] (build-4) DOCKER_HOST tcp://127.0.0.1:62596 is not listening
2023-09-07 00:09:44,102 INFO  [org.tes.doc.DockerClientProviderStrategy] (build-4) Found Docker environment with local Unix socket (unix:///var/run/docker.sock)
2023-09-07 00:09:44,105 INFO  [org.tes.DockerClientFactory] (build-4) Docker host IP address is localhost
2023-09-07 00:09:44,133 INFO  [org.tes.DockerClientFactory] (build-4) Connected to docker:
  Server Version: 24.0.2
  API Version: 1.43
  Operating System: Docker Desktop
  Total Memory: 7859 MB
2023-09-07 00:09:44,151 INFO  [org.tes.uti.ImageNameSubstitutor] (build-4) Image name substitution will be performed by: DefaultImageNameSubstitutor (composite of 'ConfigurationFileImageNameSubstitutor' and 'PrefixingImageNameSubstitutor')
2023-09-07 00:09:44,156 INFO  [org.tes.DockerClientFactory] (build-4) Checking the system...
2023-09-07 00:09:44,157 INFO  [org.tes.DockerClientFactory] (build-4) ✔︎ Docker server version should be at least 1.6.0
2023-09-07 00:09:44,387 INFO  [tc.doc.io/.3.4] (build-4) Creating container for image: docker.io/vectorized/redpanda:v22.3.4
2023-09-07 00:09:45,210 INFO  [org.tes.uti.RegistryAuthLocator] (build-4) Credential helper/store (docker-credential-desktop) does not have credentials for docker.io
2023-09-07 00:09:45,224 INFO  [tc.tes.5.1] (build-4) Creating container for image: testcontainers/ryuk:0.5.1
2023-09-07 00:09:45,732 INFO  [tc.tes.5.1] (build-4) Container testcontainers/ryuk:0.5.1 is starting: ead34af0159abb979be5703ca2a2abccaaba63f4db4c992d9fcc73b92def891c
2023-09-07 00:09:46,455 INFO  [tc.tes.5.1] (build-4) Container testcontainers/ryuk:0.5.1 started in PT1.231573S
2023-09-07 00:09:46,669 INFO  [tc.doc.io/.3.4] (build-4) Container docker.io/vectorized/redpanda:v22.3.4 is starting: db07112fa932196ada9bc738257d6ffb2a03f0013bb195a76f589167ea28630d
2023-09-07 00:09:48,579 INFO  [tc.doc.io/.3.4] (build-4) Container docker.io/vectorized/redpanda:v22.3.4 started in PT4.415492S
2023-09-07 00:09:48,580 INFO  [io.qua.kaf.cli.dep.DevServicesKafkaProcessor] (build-4) Dev Services for Kafka started. Other Quarkus applications in dev mode will find the broker automatically. For Quarkus applications in production mode, you can connect to this by starting your application with -Dkafka.bootstrap.servers=OUTSIDE://localhost:32770
2023-09-07 00:09:49,789 INFO  [io.sma.rea.mes.kafka] (main) SRMSG18229: Configured topics for channel 'signals': [signals]
2023-09-07 00:09:50,435 INFO  [io.sma.rea.mes.kafka] (smallrye-kafka-producer-thread-0) SRMSG18258: Kafka producer kafka-producer-signals-out, connected to Kafka brokers 'OUTSIDE://localhost:32770', is configured to write records to 'signals'
2023-09-07 00:09:50,503 INFO  [io.sma.rea.mes.kafka] (smallrye-kafka-consumer-thread-0) SRMSG18257: Kafka consumer kafka-consumer-signals, connected to Kafka brokers 'OUTSIDE://localhost:32770', belongs to the 'iot-receiver' consumer group and is configured to poll records from [signals]
2023-09-07 00:09:50,663 INFO  [io.quarkus] (main) iot-receiver 1.0.0-SNAPSHOT on JVM (powered by Quarkus 3.3.0) started in 9.323s. Listening on: http://localhost:8081
2023-09-07 00:09:50,663 INFO  [io.quarkus] (main) Profile test activated.
2023-09-07 00:09:50,664 INFO  [io.quarkus] (main) Installed features: [cdi, kafka-client, resteasy-reactive, smallrye-context-propagation, smallrye-reactive-messaging, smallrye-reactive-messaging-kafka, vertx]
2023-09-07 00:09:55,138 INFO  [io.sma.rea.mes.kafka] (vert.x-eventloop-thread-3) SRMSG18256: Initialize record store for topic-partition 'signals-0' at position -1.
[INFO] Tests run: 1, Failures: 0, Errors: 0, Skipped: 0, Time elapsed: 19.15 s -- in com.systemcraftsman.demo.IotReceiverTest
2023-09-07 00:09:56,148 INFO  [io.sma.rea.mes.kafka] (smallrye-kafka-consumer-thread-0) SRMSG18224: Executing consumer revoked re-balance listener for group 'iot-receiver'
2023-09-07 00:09:56,230 INFO  [io.quarkus] (main) iot-receiver stopped in 1.043s
[INFO]
[INFO] Results:
[INFO]
[INFO] Tests run: 1, Failures: 0, Errors: 0, Skipped: 0
[INFO]
[INFO] ------------------------------------------------------------------------
[INFO] BUILD SUCCESS
[INFO] ------------------------------------------------------------------------
[INFO] Total time:  32.489 s
[INFO] Finished at: 2023-09-07T00:09:56+03:00
[INFO] ------------------------------------------------------------------------
If you want to, you can create a configuration file called application-test.properties and use it for the tests in your Micronaut application.
To learn more about Micronaut Test Resources, check out this documentation.
You can find the solution of the demo in the same repository’s solution branch.
Conclusion
Congratulations! You’ve implemented two integration tests for two different frameworks.
The integration of Testcontainers into your development process streamlines both development and testing, ultimately boosting the overall efficiency of your development environment. With Testcontainers, you can count on a reliable integration testing environment, eliminating concerns about the management of testing infrastructure and its associated maintenance expenses. It’s no surprise that leading Java frameworks such as Quarkus and Micronaut seamlessly integrate Testcontainers into their development toolkits.
For more information about Testcontainers capabilities and Testcontainers Cloud, a cloud-based solution for Testcontainers, you can visit www.testcontainers.com.
by Aykut Bulgu
Aykut Bulgu has 15+ years of experience working as a software engineer, consultant, trainer, and technical content architect. He has worked on many enterprise projects—mainly Java— nd has expertise in JBoss middleware. He’s an expert on Apache Kafka, Apache Camel, Kubernetes/OpenShift, and Strimzi (Kafka on Kubernetes). He helps organizations with technical content development and training via System Craftsman.
