
If you were building a car, you’d want to check that all its parts are working together properly before you take it out on the road. If you need to test its brakes, for example, you don’t want to risk finding out they don’t work while on the road with other cars and people around.
In the same way, you want to test your code before you release it into the real world. For example, if you’re building a web app that uses a database, you need to test how your application interacts with the database. However, you don’t want to test against the actual production database as that could lead to data loss or other problems. Instead, you might decide to create a temporary, isolated database that you can use for testing.
This is where Testcontainers comes in. Testcontainers is a library that makes it easy for developers to create and manage disposable containers for services such as databases, in-memory data stores, message brokers, and other dependencies that are required for unit and integration testing.
Just like how a test track allows you to test your car’s brakes safely, Testcontainers creates a provisional, isolated environment where developers can test their code against real-world dependencies without any risks. Also, because tests are executed against a consistent environment, it ensures the same experience for multi-developer environments and the reliability of the test suite.
Testcontainers provides APIs in various programming languages to facilitate and automate the setup and teardown of test environments. In this article, you will learn how to use testcontainers-go, the Golang version of the library, to create unit and integration tests for a Golang database-driven application.
Getting Started
Before you can get started, you need to have a few things in place. In this section, you will set up your environment, clone the Golang app you will be testing, and install testcontainers-go.
Setting Up Docker
Testcontainers can spin up containers using any of the supported container runtimes such as Docker Desktop, OrbStack, or Podman installed locally. You can use Testcontainers Cloud so that you don’t have to install any container runtimes locally.
This tutorial will use Docker, so if you don’t have it installed, follow the official documentation to set it up.
Cloning the Demo Application Repository
The demo application you will be testing is a simple API server that accesses a database to store and retrieve student records. It makes use of the Gin router for the HTTP server and MySQL/MariaDB for the database. The database consists of only one table, namely student.
To clone the demo application, use the following command:
$ git clone -b demo https://github.com/testcontainers-community/testcontainers-go-demo
If you want to review the final code, config, and output files of this tutorial, they are hosted on the main branch of the same repository on GitHub.
Below is the file directory structure of the project on the demo branch:
testcontainers-go-demo/
├── database
│   ├── database.go
│   └── students.sql.go
├── server
│   ├── handlers.go
│   └── server.go
├── go.mod
├── go.sum
└── main.go
- The
databasedirectory contains two files with code for database interaction, such as connecting to the database, creating the student table, and inserting and retrieving the student records. - The
serverdirectory contains two files containing code for running the web server. Theserver.gofile contains code for starting the HTTP server with endpoints for creating a record and retrieving all records or a record by ID. Thehandlers.gofile contains code for how requests from the endpoints are served depending on the operation and database interaction. - The
main.gofile contains the entry code for the application. go.modandgo.sumare files created by Go modules for dependency management, so they shouldn’t be edited manually.
The entire code is well commented to help you work with it.
Note: testcontainers-go uses go mod for dependency management, so if you were not using this demo project, you would need to initialize Go modules for your project with this command:
$ go mod init https://github.com/testcontainers-community/testcontainers-go-demo
go: creating new go.mod: module https://github.com/testcontainers-community/testcontainers-go-demo
You would need to replace the GitHub link in the command above with your project repository or use your project name as the module name.
Installing testcontainers-go
To install the testcontainers-go library, you need to add it to your project dependencies using go mod. Execute the command below in the project directory:
$ go get -u github.com/testcontainers/testcontainers-go
This command downloads Testcontainers and all its dependencies and makes it available for use in your project.
$ go get -u github.com/testcontainers/testcontainers-go/modules/mariadb
This command downloads the testcontainers-go MariaDB module along with all its dependencies and makes it available for use in your project.
Writing Database Unit Tests with testcontainers-go
You are now ready to start writing some Go code for your tests using testcontainers-go.
In this section, you will test the various database queries that get called for inserting a student record, retrieving one record by ID, and retrieving multiple student records. You will use Testcontainers to provide access to a MariaDB database running in a Docker container.
Setting Up a MariaDB Database with Testcontainers
First, in the root of the project directory, create a file called testcontainer_test.go in that directory and paste this code into it:
package main

import (
	"context"
	"github.com/docker/go-connections/nat"
	"github.com/testcontainers/testcontainers-go"
	"github.com/testcontainers/testcontainers-go/modules/mariadb"
	"log"
	"os"
	"studentAPI/database"
	"testing"
)

// Declaration of global variables
var (
	mariadbContainer testcontainers.Container
	mariadbHost      string
	mariadbPort      nat.Port
	ctx              = context.Background()
)

func setupContainer() error {
	// Defining parameters for MariaDB container
	var err error
	mariadbContainer, err = mariadb.RunContainer(ctx,
		testcontainers.WithImage("mariadb:10.6"),
		mariadb.WithDatabase(dbname),
		mariadb.WithUsername(user),
		mariadb.WithPassword(password),
	)

	if err != nil {
		return err
	}

	// Get the container's host and port
	mariadbHost, err = mariadbContainer.Host(ctx)
	if err != nil {
		return err
	}
	//obtaining the externally mapped port for the container
	mariadbPort, err = mariadbContainer.MappedPort(ctx, "3306")
	if err != nil {
		return err
	}
	return nil
}

// Perform database migration
func setupDBConnection() error {
	//establish connection to MariaDB database container
	err := database.Connect(user, password, mariadbHost, mariadbPort.Port(), dbname)
	if err != nil {
		return err
	}

	//setup student table and insert few dummy records
	database.Setup()
	return nil
}

// This contains setup and teardown code gets called before all test functions.
func TestMain(m *testing.M) {
	//Set up container
	if err := setupContainer(); err != nil {
		log.Fatal(err.Error())
	}

	//Run DB Migrations
	if err := setupDBConnection(); err != nil {
		log.Fatal(err.Error())
	}

	//executing all other test suite
	exitCode := m.Run()

	//Destruct database container after completing tests
	if err := mariadbContainer.Terminate(ctx); err != nil {
		log.Fatalf("failed to terminate container: %s", err)
	}
	os.Exit(exitCode)
}
In short, this code starts up the database container, creates a student table, and inserts ten students records into it. It starts by importing the various packages that will be needed for the tests and then declaring the constants and variables needed for holding the connection details. After that, you have the three main functions.
setupContainer(): This function first has the definition for the database container that Testcontainers is expected to start. That definition is then used to start running the container. The container hostname and exposed port are then obtained and assigned to their respective global variables for later use.setupDBConnection(): This function uses the various database connection properties declared and assigned earlier to establish a connection to the MariaDB database container. After establishing the connection, it calls a setup method from the database package in the application to create the table needed to insert some dummy records.TestMain(): This function is the starting point of test execution in Golang where all your setup and teardown logic will be written. The first two methods above are called to set up a working database with some records in it, and a connection is established for further interaction. It then runs any other test functions in the same file or test package. In this case, it’sTestA(), which you will see in the test suite to follow. Once done, it removes the database container completely.
Defining Your Unit Tests
Next, you need to add the unit tests for the database methods to interact with the student table. In the project directory, create another file named database_tests.go and paste the content below into it:
package tests

import (
	"fmt"
	"studentAPI/database"
	"testing"
	"time"
)

func TestA(t *testing.T) {

	//variable to hold student ID returned after the creation of the record
	var sID int64

	//test case for AddStudent database function
	t.Run(fmt.Sprintf("AddStudent Test"), func(t *testing.T) {
		s := database.Student{
			Fname:       "Leon",
			Lname:       "Ashling",
			DateOfBirth: time.Date(1994, time.August, 14, 23, 51, 42, 0, time.UTC),
			Email:       "lashling@mail.com",
			Address:     "39 Kipling Pass",
			Gender:      "Male",
		}

		//adding student record to table
		var err error
		sID, err = database.AddStudent(s)
		if err != nil {
			fmt.Println(err)
		}
		t.Logf("Created student successfully with ID: %v \n", sID)

	})

	//test case for StudentByID database function
	t.Run(fmt.Sprintf("StudentByID Test"), func(t *testing.T) {
		//selecting student by ID
		st, err := database.StudentByID(sID)
		if err != nil {
			fmt.Println(err)
		}
		t.Logf("Retreived student by ID successfully with ID: %v \n", sID)
		t.Logf("Student Details: %v \n", st)

	})

	// test case for FetchStudents database function
	t.Run(fmt.Sprintf("FetchStudents Test"), func(t *testing.T) {
		//retrieving all records
		students, err := database.FetchStudents()
		// check if errors were returned
		if err != nil {
			t.Error(err)
		}
		t.Logf("Fetched all students data successfully with total of %v records \n", len(students))
	})

}
This file consists of one method, TestA(), with three tests within it. Each of the cases runs a test for a specific database operation in the database package of the demo application.
- The first test case runs a test for the
database.AddStudent()function that accepts the user values or details in a struct form and performs a database insert operation. If there are any errors, the test fails. If there are no errors, it returns the record ID and assigns it to thesIDvariable declared before this test case. - The second test case runs a test for the
database.StudentByID()and passes along thesIDof the record created by the previous test case. If there are no errors during the operation, the database record with that ID is retrieved and logged. - The third test case uses the
database.FetchStudents()function to retrieve all student records from the database. If there are no errors during the operation, the count of the total number of records retrieved is logged to the standard output.
Running Your Unit Tests
You’re now ready to run your unit tests by using the go test command. By default, the Go testing framework does not display logged messages unless executed with the -v flag. To aid your understanding of what is going on, you can run the command with the -v flag as seen below.
$ go test -v -run=TestA
You should get a similar output as in the image below:
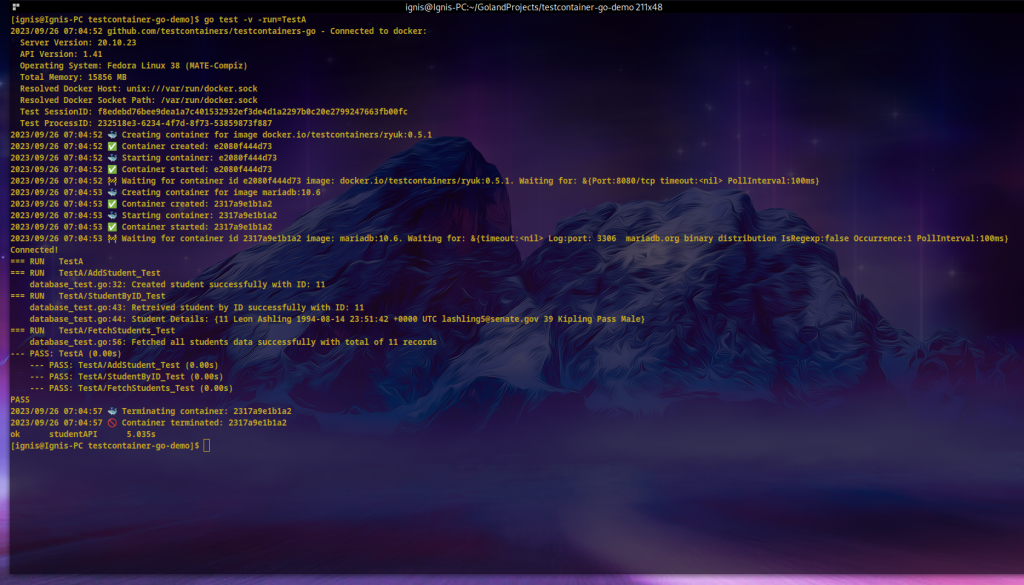
As you can see, Testcontainers obtains the container image using the version specified in the container definition. It then starts it and waits until it establishes a connection to the MariaDB port. It then runs the unit test in TestA() and logs the results.
Writing Integration Tests with testcontainers-go
While unit tests are great to ensure individual functions or aspects of your application are working as expected, integration tests are crucial for ensuring all those parts work together as one system.
In this section, you will learn how to automate the testing of your application right from receiving HTTP requests through to processing them and producing the expected results—just as if the calls were made from a different application or testing tool such as Postman. You will also be introduced to working with some other testing tools such as stretchr/testify and net/http/httptest.
Create a directory called testdata within your tests directory and create setup.sql file with the following content:
CREATE TABLE students (
    id bigint NOT NULL AUTO_INCREMENT,
    fname varchar(50) not null,
    lname varchar(50) not null,
    date_of_birth datetime not null,
    email varchar(50) not null,
    address varchar(50) not null,
    gender varchar(50) not null,
    PRIMARY KEY (id)
);

insert into students (id, fname, lname, date_of_birth, email, gender, address) values (1, 'Caddric', 'Likely', '2000-07-06 02:43:37', 'clikely0@mail.com', 'Male', '9173 Boyd Street');
insert into students (id, fname, lname, date_of_birth, email, gender, address) values (2, 'Jerad', 'Ciccotti', '1993-02-11 15:59:56', 'jciccotti1@mail.com', 'Male', '34 Declaration Drive');
insert into students (id, fname, lname, date_of_birth, email, gender, address) values (3, 'Hillier', 'Caslett', '1992-09-04 13:38:46', 'hcaslett2@mail.com', 'Male', '36 Duke Trail');
insert into students (id, fname, lname, date_of_birth, email, gender, address) values (4, 'Bertine', 'Roddan', '1991-02-18 09:10:05', 'broddan3@mail.com', 'Female', '2896 Kropf Road');
insert into students (id, fname, lname, date_of_birth, email, gender, address) values (5, 'Theda', 'Brockton', '1991-10-29 09:08:48', 'tbrockton4@mail.com', 'Female', '93 Hermina Plaza');
insert into students (id, fname, lname, date_of_birth, email, gender, address) values (6, 'Leon', 'Ashling', '1994-08-14 23:51:42', 'lashling5@mail.com', 'Male', '39 Kipling Pass');
insert into students (id, fname, lname, date_of_birth, email, gender, address) values (7, 'Aldo', 'Pettitt', '1994-08-14 22:03:40', 'apettitt6@mail.com', 'Male', '38 Dryden Road');
insert into students (id, fname, lname, date_of_birth, email, gender, address) values (8, 'Filmore', 'Cordingly', '1999-11-20 02:35:48', 'fcordingly7@mail.com', 'Male', '34 Pawling Park');
insert into students (id, fname, lname, date_of_birth, email, gender, address) values (9, 'Katalin', 'MacCroary', '1994-11-08 11:59:19', 'kmaccroary8@mail.com', 'Female', '2540 Maryland Parkway');
insert into students (id, fname, lname, date_of_birth, email, gender, address) values (10, 'Franky', 'Puddan', '1995-04-23 17:07:29', 'fpuddan9@mail.com', 'Female', '3214 Washington Road');
In order to create MariaDB container with the database initialised using the above setup.sql, we can simply create the container as follows:
mariadbContainer, err := mariadb.RunContainer(ctx,
    testcontainers.WithImage("mariadb:10.6"),
    mariadb.WithScripts(filepath.Join("testdata", "setup.sql")),
    mariadb.WithDatabase(dbname),
    mariadb.WithUsername(user),
    mariadb.WithPassword(password),
)
But, if you have a custom image hardened with security fixes and you want to use that custom image created via Dockerfile, you can achieve that as well.
Creating Container using Dockerfile
You have already seen how to define and control a container completely from within your test code, but what if you already have an existing Dockerfile that you want to use for your tests? It may contain configurations on top of the default image for a specific scenario or requirement.
Since Testcontainers also allows you to create containers using your existing Dockerfile, in this integration test, you will use an existing Dockerfile with Testcontainers to create and establish a database connection for a successful test.
The above file will be executed in our database container upon creation to set up the table and insert ten dummy records.
Create Dockerfile, in testdata directory with the following content:
#Using 10.6 version of Mariadb as BASE
FROM mariadb:10.6

#COPYING SQL SCRIPT FOR TABLE CREATION AND DUMMY RECORDS
COPY setup.sql /docker-entrypoint-initdb.d/

# More customizations

CMD ["mysqld"]
This container will use the 10.6 version of MariaDB as its base, then copy the setup.sql file into the container to be executed once it has started running. It means that you will not be setting up the database tables from within your code this time.
Installing the stretchr/testify Package
The stretchr/testify package provides subpackages with various functions to allow you to be sure your code does what it’s expected to do. To use this package in your test, add it using the following command:
$ go get github.com/stretchr/testify
It will take a few seconds or minutes for the package and all its dependencies to download and be made available in your application. You will use this package later in this section.
Accessing Your Dockerfile Using testcontainers-go
Now that you have your container files in place, create a file called server_test.go for your integration test inside the tests directory, then paste the following code into it:
package tests

import (
	"bytes"
	"context"
	"encoding/json"
	"fmt"
	"github.com/stretchr/testify/assert"
	"github.com/testcontainers/testcontainers-go"
	"github.com/testcontainers/testcontainers-go/wait"
	"net/http"
	"net/http/httptest"
	"studentAPI/database"
	"studentAPI/server"
	"testing"
	"time"
)

func setupWithDockerFile(user, password, dbname string, ctx context.Context) (testcontainers.Container, error) {
	req := testcontainers.ContainerRequest{
		FromDockerfile: testcontainers.FromDockerfile{
			Context: "./testdata",
			Dockerfile: "Dockerfile",
		},
		ExposedPorts: []string{"3306/tcp"}, //container port to expose
		Env: map[string]string{ 			//Values for container environmental variables
			"MARIADB_ROOT_PASSWORD": password,
			"MARIADB_USER":          user,
			"MARIADB_PASSWORD":      password,
			"MARIADB_DATABASE":      dbname,
		},
		//Checking for Mariadb started listeneing on this port
		WaitingFor: wait.ForListeningPort("3306/tcp"),
	}

	//Starting the MariaDB Container
	customContainer, err := testcontainers.GenericContainer(ctx, testcontainers.GenericContainerRequest{
		ContainerRequest: req,
		Started:          true,
	})

	//Stop tests if any errors encountered when setting up database connection
	if err != nil {
		return nil, err
	}

	// Get the container's host and port
	cHost, err := customContainer.Host(ctx)
	if err != nil {
		return nil, err
	}
	//obtaining the externally mapped port for the container
	cPort, err := customContainer.MappedPort(ctx, "3306")
	if err != nil {
		return nil, err
	}

	//establish connection to MariaDB database container
	if err := database.Connect(user, password,cHost, cPort.Port(), dbname); err != nil {
		return nil, err
	}

	return customContainer, nil
}
The snippet above first imports the needed packages, then has the function setupWithDockerFile() for setting up your custom docker image. It accepts three string values for the user, password, and database name when defining the properties of the database container. It also accepts a context that is used when starting the container.
Notice that the testcontainers-go container definition is slightly different from the one used in the database unit test. Here, the attribute FromDockerfile is used to define two things.
Context: This is the path to the directory that contains your Dockerfile and all other files needed by the Dockerfile when creating the image for your container. In this case, it is thetestdatadirectory created earlier.Dockerfile: This is the path or name ofDockerfilewithin the defined path or directory for theContext.
The container is then started and a connection to the database is established. If there are no errors during the start operation, the container is returned. Otherwise, the test fails with a fatal error.
Creating Your First HTTP Test
In this section, you will use the net/http/httptest package, which has already been imported from the standard library, to mimic a typical HTTP client sending a request to your server. At the same time, Testcontainers will provide the demo API service with a stable database service defined with the custom Dockerfile above. Depending on the API call, records will be stored or retrieved here. For starters, you will test a post request to the /students endpoint of the demo API application.
To get started, paste the following code beneath the setupWithDockerFile() function in the server_test.go file:
func TestB(t *testing.T) {

	ctx := context.Background()
	//Setting up database container using custom Dockerfile
	_, err := setupWithDockerFile("theuser", "thepass", "thedb", ctx)

	//Stop tests if any errors encountered when setting up database connection
	if err != nil {
		t.Fatal(err.Error())
	}
	//setting up API Server Router
	router := server.SetupRouter()

	//Testing a POST HTTP request to /students
	t.Run(fmt.Sprintf("CREATE STUDENT API Test"), func(t *testing.T) {
		//Record to be submitted for insertion
		s := database.Student{
			Fname:       "Ben",
			Lname:       "Sterlin",
			DateOfBirth: time.Date(1998, time.August, 17, 23, 51, 42, 0, time.UTC),
			Email:       "Benlin@mail.com",
			Address:     "39 Benling Pass",
			Gender:      "Male",
		}

		//converting struct into json
		body, err := json.Marshal(s)
		if err != nil {
			t.Fatal("Unable to marshal student struct")
		}

		//Creating a GET HTTP request to /home
		req, _ := http.NewRequest("POST", "/students", bytes.NewBuffer(body))
		req.Header.Set("Content-Type", "application/json")

		// initializing a recorder to keep track of response from the HTTP server
		w := httptest.NewRecorder()

		//Passing the request to the API router to serve
		router.ServeHTTP(w, req)

		//Using the assert sub package of the stretchr/testify to ensure the response was successful
		assert.Equal(t, http.StatusCreated, w.Code)

		// Asserting to ensure the response is body produced as expected
		assert.Equal(t, `{"success":true,"message":"","data":11}`, w.Body.String())
		t.Logf("Successfully created student record with response: %v \n", w.Body.String())
	})

}
The code above is simple, with several comments to help you understand every step.
The code initializes the Student struct with the details of the student to be created and marshals or converts it into JSON for the body of the request. It then defines an HTTP POST request for the /students endpoint with the JSON data as the request body and the Content-Type header set appropriately. A response recorder is created to hold the response to the request.
The request is made mimicking a real-life HTTP request to the API server’s router, and the router’s response from the server is recorded. The response is checked with the Assert package to determine whether the request returned with a status code of 201. If the response body is as expected, the test passes. If not, it fails.
Running Your First HTTP Test
You can execute your test using the command from the previous section; however, it will execute all tests (both unit and integration tests) inside the tests directory. You may therefore rather want to use the command below that specifies the name of the test function you want to execute:
$ go test server_test.go -v
You should get an output similar to the one below:
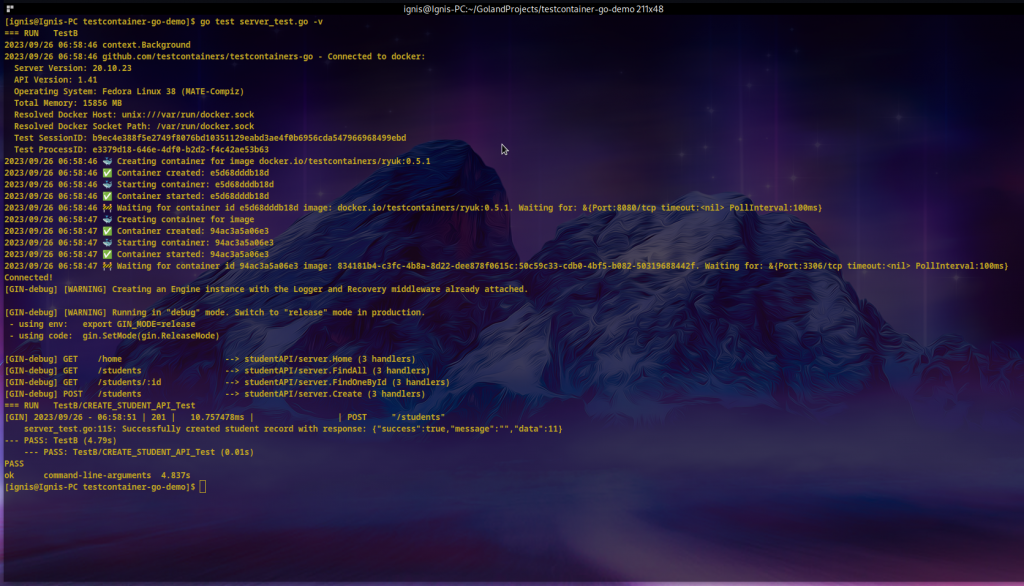
As you can see, Testcontainers started the database, and the test was successful: the student details were submitted successfully and inserted into the database. This means you have successfully tested the demo application as though an external application made the API call.
You can find the complete code for this tutorial in this GitHub repository. In server_test.go, you can also find a test for getting one record by ID.
Conclusion
In this tutorial, you have seen how Testcontainers streamlines the tedious process of setting up various local database servers or building various containers manually for unit and integration testing. You’ve seen how to easily define containers for running the needed services right within your Go test code.
You have also explored the various options for configuring and customising your containers. Instead of manually starting, stopping, and removing containers for testing or manually connecting to them to run configuration commands or start migrations, Testcontainers lets you control all setup tasks and teardown operations from your test codes. Lastly, you have learned about unit and integration testing using both the Golang standard library and other testing packages such as stretchr/testify.
You can refer to the testcontainers-go site for a complete list of features and modules supported and some more examples. Also, check out the Go developer documentation for other functions you can use to interact further and customise your experience.
by Rexford A. Nyarko
Rexford Nyarko is a solution architect with a background in software and network systems, cloud environments, server administration, and various database technologies. Rexford particularly enjoys explaining technical concepts to non-technical audiences.
