
Quarkus is one of the most popular frameworks in the JVM ecosystem that revolutionized the way developers create cloud-native, serverless, and microservices applications. Quarkus is designed to run JVM based applications in a containerized, resource-efficient environment to achieve good performance and reduced memory footprint.
One of the key goals of Quarkus is to provide a good Developer Experience (DX). Quarkus provides Dev Mode with Live Reload, Dev Services, Continuous Testing, etc., to provide a smoother developer workflow.
Provisioning dependent services like databases, message brokers, etc., during local development and integration testing remains a common challenge. Quarkus Dev Services tackles this problem by provisioning the required dependencies automatically, using Testcontainers under the hood.
To learn how Quarkus and Testcontainers work together, please read the Development and Testing of Quarkus applications using Testcontainers guide.
AtomicJar recently introduced Testcontainers Desktop, a free companion app for the Testcontainers OSS libraries that makes local development and testing with real dependencies even easier.
Let’s explore how we can use the Testcontainers Desktop app while building a Quarkus application.
First, go to https://testcontainers.com/desktop/ and install the Testcontainers Desktop app by following the installation instructions for your operating system.
Create a Quarkus application
You can generate a Quarkus application from https://code.quarkus.io/ by selecting the desired extensions. Let’s build a simple REST API application using RESTEasy Reactive, Hibernate ORM with Panache, and PostgreSQL.
Select the following extensions and generate the application:
- RESTEasy Reactive
- RESTEasy Reactive Jackson
- Hibernate ORM with Panache
- JDBC Driver – PostgreSQL
- Flyway
You can click on this link to preselect all the above-mentioned extensions and generate the application.
Let’s build a simple REST API with one endpoint (GET /api/customers) to get all customers and another endpoint (POST /api/customers) to create a new customer. You can implement the REST API by following the detailed steps in the Development and Testing of Quarkus applications using Testcontainers guide.
For quick reference, here is the code that implements the REST API for the demo application of the aforementioned guide.
Customer.java
@Entity
@Table(name = "customers")
public class Customer extends PanacheEntity {

   @Column(nullable = false)
   public String name;

   @Column(nullable = false, unique = true)
   public String email;

   public Customer() {}

   public Customer(Long id, String name, String email) {
       this.id = id;
       this.name = name;
       this.email = email;
   }
}
CustomerService.java
@ApplicationScoped
@Transactional
public class CustomerService {

   public List<Customer> getAll() {
       return Customer.listAll();
   }

   public Customer create(Customer customer) {
       customer.persist();
       return customer;
   }
}
CustomerResource.java
@Path("/api/customers")
@Produces(MediaType.APPLICATION_JSON)
@Consumes(MediaType.APPLICATION_JSON)
public class CustomerResource {
   private final CustomerService customerService;

   public CustomerResource(CustomerService customerService) {
       this.customerService = customerService;
   }

   @GET
   public List<Customer> getAllCustomers() {
       return customerService.getAll();
   }

   @POST
   public Response createCustomer(Customer customer) {
       var savedCustomer = customerService.create(customer);
       return Response
                .status(Response.Status.CREATED)
                .entity(savedCustomer)
                .build();
   }
}
We are going to use Flyway for database migrations. So, create a V1__init_database.sql file in the src/main/resources/db/migration directory with the following content:
create sequence customers_seq start with 1 increment by 50;

create table customers
(
    id    bigint DEFAULT nextval('customers_seq') not null,
    name  varchar                                 not null,
    email varchar                                 not null,
    primary key (id)
);

insert into customers(name, email) values
('john', 'john@mail.com'),
('rambo', 'rambo@mail.com');
Next, configure the following properties in the src/main/resources/application.properties file:
# Enable running the flyway migration on start of the application
quarkus.flyway.migrate-at-start=true
# Run tests by starting the application on a random available port
quarkus.http.test-port=0
Finally, let’s write tests for our API using RestAssured as follows:
@QuarkusTest
class CustomerResourceTest {

   @Test
   void shouldGetAllCustomers() {
       List<Customer> customers = get("/api/customers")
               .then()
               .statusCode(200)
               .extract().body()
               .jsonPath().getList(".", Customer.class);
       assertFalse(customers.isEmpty());
   }

   @Test
   void shouldCreateCustomerSuccessfully() {
       Customer customer = new Customer(null, "John", "john@gmail.com");
       given().contentType(ContentType.JSON)
               .body(customer)
               .when()
               .post("/api/customers")
               .then()
               .statusCode(201)
               .body("name", is("John"))
               .body("email", is("john@gmail.com"));
   }
}
Now you can run the tests by executing the command ./mvnw test. You should notice that Quarkus automatically started a PostgreSQL database container based on the postgres:14 docker image using Testcontainers and ran the tests against that database.
It is always a good practice to specify which postgres version you would like to use and you can do it by configuring the following property in the application.properties file:
quarkus.datasource.devservices.image-name=postgres:15.2-alpine
Just as Quarkus Dev Services provide the necessary services during testing, they will also provide those services to run the application locally. You can start the application in dev mode by running the command ./mvnw quarkus:dev and in the console logs you can notice that a PostgreSQL database container is started and the application is automatically configured to use that database.
Connecting to a development service via a fixed port
During local development you may want to connect to the database and inspect the data in its tables. By default, the Dev Services containers will be started and mapped to a random available port on the host machine. So it would be tedious to keep checking the mapped host port and connecting to the database each time the container is started.
The Testcontainers Desktop app makes it easy to use fixed ports for your container so that you can always use that same fixed host port to connect to the container from external tools during the development.
Click on Testcontainers Desktop -> select Services -> Open config location.
In the opened directory there would be a postgres.toml.example file. Rename it to postgres.toml and it should contain the following configuration:
ports = [
    {local-port = 5432, container-port = 5432},
]
selector.image-names = ["postgres"]
We mapped the PostgreSQL container’s port 5432 onto the host’s port 5432 and configured the image selector as “postgres”, which is the docker image name.
Assuming you have psql tool installed, you should be able to connect to the PostgreSQL database running as a Docker container from the command line using the following command:
$ psql -h localhost -p 5432 -U quarkus -d quarkus
// default password is 'quarkus'
You can customize the default Dev Services DataSource properties in the application.properties file as follows:
quarkus.datasource.devservices.username=postgres
quarkus.datasource.devservices.password=postgres
quarkus.datasource.devservices.db-name=postgres
The ability to use fixed ports and connect to those services is very helpful during the development time without trading off the dynamic configuration Testcontainers provides or ability to run your tests in parallel.
Continuous testing with reusable containers
When you start the application in dev mode using ./mvnw quarkus:dev you can see in the console that Tests are paused and you can press “r” to resume testing. If you press r then you can see a new PostgreSQL container is started for test execution instead of using the already running container. Also, if you stop the application by pressing “q” then you can see that the PostgreSQL container is removed.
During development time, you may want to keep changing the code, re-run tests, and even stop and restart the application several times. During this process, you may want to reuse the same container instead of recreating the containers, to speed up your feedback cycle.
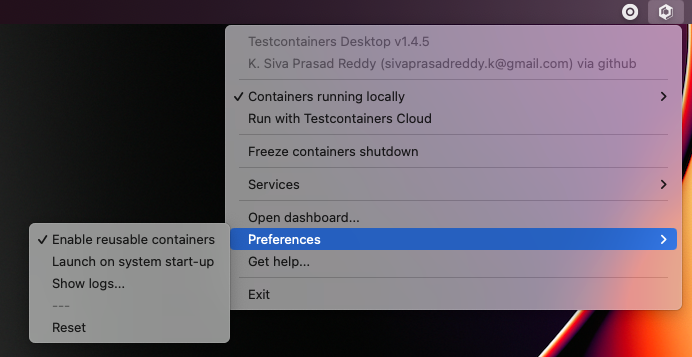
You can use the reusable containers feature to speed up testing and local development and continuous testing. You can enable or disable reuse by clicking on Enable reusable containers option under Preferences.
When the reuse feature is enabled, your tests use the same containers that are already running and also these containers will not be removed even if you stop the application. You can stop and restart the application and the existing containers will be reused. This will cut down the time to recreate the containers and improve the short feedback cycles, and everything without making any changes to the code.
Summary
Quarkus provides a better developer experience by providing Dev Services leveraging Testcontainers behind the scenes. The Testcontainers Desktop app improves this experience even more by providing features like fixed ports, reusable containers, etc. You can also switch container runtimes from local docker to Testcontainers Cloud seamlessly.
What are you waiting for? Install the Testcontainers Desktop app and experience the joy of building your awesome applications using Quarkus and Testcontainers.
