
When developers write tests that cover integration points, traditionally, they often avoid integrating real systems for testing because of the time and maintenance costs, even though it’s the ideal. Instead, they mock the integration points—for example, another service or middleware such as Apache Kafka —and focus on the logic.
Mocking has benefits, including avoiding the complexity of integrated systems as well as faster test implementation and faster results. However, it also has some serious drawbacks. You don’t test the real integration, so there might be unpredictable issues with a message sending to the system.
When you work with Kafka, for example, mocking means that you can’t test your code against a real Kafka instance. If you’re developing a Kafka admin application that interacts with the Kafka configurations, mocking also doesn’t let you test it. This means that what are supposed to be integration tests actually end up being much closer to mocked unit tests.
This is where Testcontainers and Testcontainers Cloud can help. Testcontainers is a testing library extension that helps developers use containers in their integration, UI, or user acceptance tests. With the help of the container technology, Tescontainers allows you to spin up ephemeral environments for your tests. Using real instances of databases, message brokers, and other technologies instead of mocks makes your tests more reliable because you’re working in a close-to-real environment where you can use real data.
In this tutorial, you’ll learn how to use Testcontainers for Java along with the Testcontainers module for Kafka Containers to write close-to-real-world integration tests. You’ll configure Testcontainers for Apache Kafka and develop tests against Apache Kafka by using Testcontainers in a Java and a Spring Boot application.
Tutorial Scenario
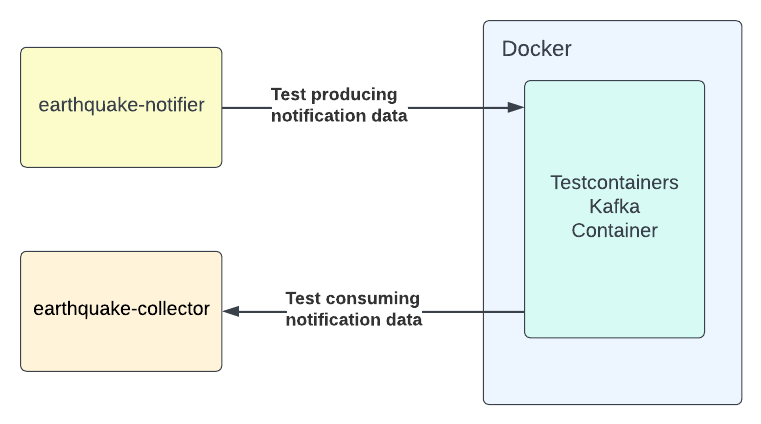
For this tutorial, suppose you’re working at a planet-monitoring company that develops applications for monitoring incidents such as floods, earthquakes, forest fires, and similar disasters. The company is developing an earthquake notification system that creates notification requests and collects and logs them in a Google Maps location URL format.
Your job is to take over the earthquake-notifier and earthquake-collector applications that were developed as prototypes. Once you take them over, you realize that neither application has any written tests. Because both applications use Apache Kafka, using Testcontainers will work well.
The tests must validate that the applications can send notification data to an Apache Kafka instance and receive the same data from it. The Kafka instance must be created and managed within the tests by using Testcontainers. The rough architecture diagram for the tests is as follows:
You can find the resources for this tutorial in this repository.
Prerequisites
To follow along with this tutorial, you need the following:
- Java 17
- A recent version of Docker (this article uses Docker Desktop 4.6.1.)
- Maven 3.6.2+
- A recent version of the Git
Setting Up the Development Environment
Before starting, clone the related repository in your home directory and change your directory to the testcontainers-kafka-java-demo folder:
git clone https://github.com/testcontainers-community/testcontainers-kafka-java-demo.git
cd testcontainers-kafka-java-demo
You’ll see apps folder in the testcontainers-kafka-java-demo directory.
Assuming you have a Kafka instance running, configure the Kafka configuration properties in application.properties.
When you run each application individually, you can start the dependent services like Kafka using Testcontainers support introduced in Spring Boot 3.0.0.
Examining the Applications
Before starting to write any tests, you should examine the earthquake-notifier and earthquake-collector applications to understand how they work.
Examining the Earthquake Notifier Application
Use an editor of your choice to open the earthquake-notifier project, which is in the apps directory. It’s a Maven-based Java project that mimics earthquake monitoring and generates help notifications, including the longitude and latitude of the earthquake location. The application then sends the generated notification data to a Kafka topic called notifications.

The App class calls the NotificationProducer.produce() method in a five-second interval to produce the generated location notification data to Kafka.
If we have configured a running Kafka instance, you can run the earthquake-notifier application and see it in action. Execute the following command to run the application in a terminal window:
mvn compile exec:java -Dexec.mainClass="com.systemcraftsman.demo.App"
The output after a couple of minutes should be as follows:
...output omitted...
com.systemcraftsman.demo.model.LocationNotification@14207b7a[timestamp=2023-03-08 01:35:26.208044,latitude=68.841981,longitude=170.05822]
com.systemcraftsman.demo.model.LocationNotification@6b110f6a[timestamp=2023-03-08 01:35:31.672382,latitude=80.919070,longitude=-18.975043]
com.systemcraftsman.demo.model.LocationNotification@7ffa9c7f[timestamp=2023-03-08 01:35:36.716891,latitude=24.732886,longitude=78.564667]
com.systemcraftsman.demo.model.LocationNotification@61b50ba8[timestamp=2023-03-08 01:35:41.791127,latitude=-47.970869,longitude=53.883955]
com.systemcraftsman.demo.model.LocationNotification@39db9b13[timestamp=2023-03-08 01:35:46.826193,latitude=61.071585,longitude=-155.84869]
...output omitted...
Note: It might take some time to see the output as Maven might download the application dependencies.
Examining the Earthquake Collector Application
With the same IDE, open the earthquake-collector application, which is a Spring Boot application. This application collects the notification data from the notifications Kafka topic, generates a Google Map location link, and prints it out.
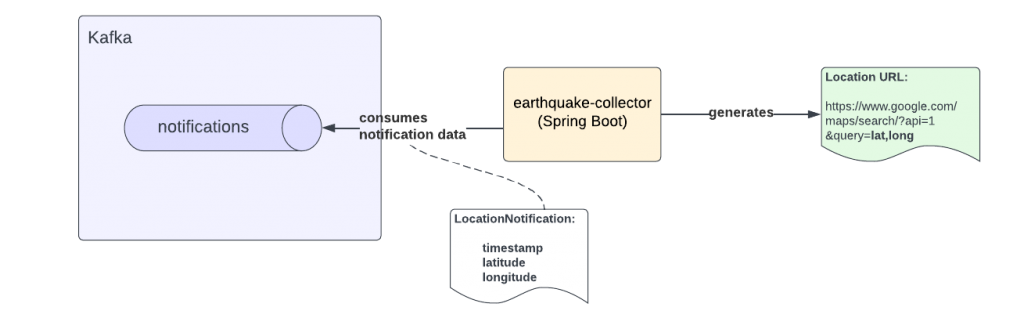
The EarthquakeCollectorApplication class is the main executable class of this Spring Boot application. The NotificationConsumer component class consumes the notification data and creates the Google Maps link URL.
In a new terminal window, execute the following command to run the earthquake-collector application and see it in action:
mvn spring-boot:run
The output should be as follows:
...output omitted...
2023-03-08T19:53:35.611+03:00  INFO 63393 --- [ntainer#0-0-C-1] c.s.demo.NotificationConsumer            : https://www.google.com/maps/search/?api=1&query=7.3371527,-56.763956
2023-03-08T19:53:40.615+03:00  INFO 63393 --- [ntainer#0-0-C-1] c.s.demo.NotificationConsumer            : https://www.google.com/maps/search/?api=1&query=12.292644,13.612932
2023-03-08T19:53:45.646+03:00  INFO 63393 --- [ntainer#0-0-C-1] c.s.demo.NotificationConsumer            : https://www.google.com/maps/search/?api=1&query=88.938394,140.49275
2023-03-08T19:53:50.677+03:00  INFO 63393 --- [ntainer#0-0-C-1] c.s.demo.NotificationConsumer            : https://www.google.com/maps/search/?api=1&query=-22.520198,35.530679
...output omitted...
Notice that both of the applications are running successfully.
Stop the earthquake-notifier and earthquake-collector applications by pressing CTRL+C on your keyboard.
Implementing the Tests
Now that you’ve examined the applications, let’s assume the applications need refactoring or new features to be developed.
Before making any change on a system, you must have some tests written, which makes sure your code changes won’t break the system. In this tutorial, you’ll learn how to implement some tests before making any changes. Take note that while a real-life application would also require unit tests, this tutorial only focuses on testing both applications’ integration with Apache Kafka by using Testcontainers.
Implementing Tests for the Earthquake Notifier
Open the earthquake-notifier application with your IDE and navigate to the pom.xml file, which includes the Java dependencies.
To make your project testable with Testcontainers, you must add the related dependencies. In the pom.xml file and add the following dependencies:
    <dependency>
      <groupId>org.testcontainers</groupId>
      <artifactId>kafka</artifactId>
      <version>${testcontainers.version}</version>
      <scope>test</scope>
    </dependency>
    <dependency>
      <groupId>org.testcontainers</groupId>
      <artifactId>junit-jupiter</artifactId>
      <version>${testcontainers.version}</version>
      <scope>test</scope>
    </dependency>
Depending on your IDE, make sure that you rebuild your Maven project so that Maven can download the new dependencies.
Navigate to the AppTest class, which is in the src/test/java/com/systemcraftsman/demo directory. You will notice that some parts of the test AppTest class are incomplete. To make it a valid test class for Testcontainers, you must apply the steps below.
Add the @Testcontainers annotation over the AppTest class definition. The class definition should look as follows:
@Testcontainers
public class AppTest {
    ...code omitted...
}
Because you need a Kafka instance for your tests, you need to create a test container for Kafka. Testcontainers has a KafkaContainer class that enables you to create a Kafka instance for testing purposes.
Add the following code to initiate a Kafka instance for your tests:
@Container
public static KafkaContainer kafka = new KafkaContainer(DockerImageName.parse("confluentinc/cp-kafka:7.4.0"));
...code omitted...
The @Container annotation is a JUnit extension that tells JUnit to notify this field about various events in a test lifecycle. In this case, it ensures that the Kafka container is running in a healthy way before any test is considered successfully run.
Because the earthquake-notifier is an application that produces messages to Kafka, the most important thing to test is the producing mechanism, which means testing if you can send a message to Kafka or not. To test it, implement the testNotificationSending() method by adding the following content to it:
@Test
public void testNotificationSending() {
        String topicName = "notifications-test";
        String bootstrapServers = kafka.getBootstrapServers();

        NotificationProducer producer = new NotificationProducer();
        producer.setBootstrapServers(bootstrapServers);
        producer.setTopicName(topicName);

        KafkaConsumer<String, Notification> consumer = new KafkaConsumer<>(ImmutableMap.of(ConsumerConfig.BOOTSTRAP_SERVERS_CONFIG, bootstrapServers, ConsumerConfig.GROUP_ID_CONFIG, "collector-test", ConsumerConfig.AUTO_OFFSET_RESET_CONFIG, "earliest"), new StringDeserializer(), new NotificationDeserializer());

        consumer.subscribe(Collections.singletonList(topicName));

        producer.produce();

        Unreliables.retryUntilTrue(10, TimeUnit.SECONDS, () -> {
            ConsumerRecords<String, Notification> records = consumer.poll(Duration.ofMillis(100));

            if (records.isEmpty()) {
                return false;
            }

            for (ConsumerRecord<String, Notification> record : records) {
                LocationNotification consumedLocationNotification = (LocationNotification) record.value();
                assertNotNull(consumedLocationNotification);
                assertNotNull(consumedLocationNotification.getLatitude());
                assertNotNull(consumedLocationNotification.getLongitude());
            }

            return true;
        });

        consumer.unsubscribe();
}
The test method first defines the Kafka topic name for the test. It then defines the Kafka bootstrap address, which is important for knowing where to send the messages. Because the Kafka bootstrap servers are generated dynamically in a Testcontainers environment, you must get if from the kafka instance that you’ve instantiated as a container.
You can see that an instance of NotificationProducer is defined to be tested along with a simple KafkaConsumer, which is created for consuming the messages that are sent by NotificationProducer.
The current test validates that the consumedLocationNotification message is not null. It also validates that it has a latitude and a longitude. To keep things simple, these are the only validations this tutorial will use, but you can add more test assertions and test cases if you’d like to.
In a terminal window, navigate to your earthquake-notifier directory and run the tests by executing the following command:
mvn test
If your test is successful, you should see an output as follows:
...output omitted...
[INFO] Tests run: 1, Failures: 0, Errors: 0, Skipped: 0, Time elapsed: 14.251 s - in com.systemcraftsman.demo.AppTest
[INFO]
[INFO] Results:
[INFO]
[INFO] Tests run: 1, Failures: 0, Errors: 0, Skipped: 0
[INFO]
[INFO] ------------------------------------------------------------------------
[INFO] BUILD SUCCESS
[INFO] ------------------------------------------------------------------------
[INFO] Total time:  16.330 s
[INFO] Finished at: 2023-03-09T01:37:19+03:00
[INFO] ------------------------------------------------------------------------
This confirms that NotificationProducer successfully works and is able to produce notification messages. If you look at the output of docker stats or check the running containers otherwise, you’ll see the containers being spun up and cleared after the tests run by Testcontainers.
Implementing Tests for the Earthquake Collector
The earthquake-collector application is a Spring Boot application, so creating a Testcontainers test for it is different from creating a test for a pure Java application.
Open the earthquake-collector application with your IDE and navigate to the pom.xml file, which includes the Java dependencies.
To make your project testable with Testcontainers, you must add the related dependencies. In the pom.xml file and add the following:
<dependency>
    <groupId>org.springframework.kafka</groupId>
    <artifactId>spring-kafka-test</artifactId>
    <scope>test</scope>
</dependency>
<dependency>
    <groupId>org.testcontainers</groupId>
    <artifactId>kafka</artifactId>
    <version>${testcontainers.version}</version>
    <scope>test</scope>
</dependency>
<dependency>
    <groupId>org.testcontainers</groupId>
    <artifactId>junit-jupiter</artifactId>
    <version>${testcontainers.version}</version>
    <scope>test</scope>
</dependency>
Depending on your IDE, make sure that you rebuild your Maven Spring Boot project so that Maven can download the new dependencies.
Navigate to the EarthquakeCollectorApplicationTest class, which is in the src/test/java/com/systemcraftsman/demo directory. Notice that it uses the same @Testcontainers annotation along with some Spring Boot annotation, which is not relevant for this article. Add the Kafka container instance for the test in the same way you’ve done for the earthquake-notifier application:
@Container
    public static KafkaContainer kafka =
            new KafkaContainer(DockerImageName.parse("confluentinc/cp-kafka:7.4.0"));
Next, you must implement the registerKafkaProperties(DynamicPropertyRegistry registry) method, which enables you to add a property dynamically. You will use this method to assign the spring.kafka.bootstrap-servers property to the bootstrap servers value of the Kafka container, which has a dynamic bootstrap server port value.
The implemented registerKafkaProperties method should be as follows:
@DynamicPropertySource
static void registerKafkaProperties(DynamicPropertyRegistry registry) {
   registry.add("spring.kafka.bootstrap-servers", () -> kafka.getBootstrapServers());
}
In the same way you tested the producing mechanism in the earthquake-notifier application, you must test the consuming mechanism in earthquake-collector. In this application, the earthquake-collector consumes notification messages from the Kafka instance and creates Google Maps URLs from each of the notifications.
To test this, implement the testNotificationArrival() method by adding the following content to it:
@Test
public void testNotificationArrival() {
    Faker faker = new Faker();

    LocationNotification locationNotification = new LocationNotification();
    locationNotification.setLongitude(faker.address().longitude());
    locationNotification.setLatitude(faker.address().latitude());

    producer.send(topic, locationNotification);

    Unreliables.retryUntilTrue(10, TimeUnit.SECONDS, () -> {
        String locationUrl = notificationConsumer.getLocationUrl();

        if (locationUrl == null)
            return false;

        assertNotNull(locationUrl);
        assertTrue(locationUrl.contains(locationNotification.getLatitude()));
        assertTrue(locationUrl.contains(locationNotification.getLongitude()));

        return true;
    });
}
The test method first creates a dummy locationNotification instance with the help of the Faker library and uses the producer to send it to Kafka. Then it uses the notificationConsumer instance, which is injected to the test class.
The test validates that the locationUrl message is not null and that the locationUrl contains the right latitude and longitude values. As mentioned before, you can add more test assertions and test cases later if you’d like to.
In a terminal window, navigate to your earthquake-collector directory and run the tests by executing the following command:
mvn test
If your test is successful, you should see an output as follows:
...output omitted...
[INFO] Tests run: 1, Failures: 0, Errors: 0, Skipped: 0, Time elapsed: 16.283 s - in com.systemcraftsman.demo.EarthquakeCollectorApplicationTest
[INFO]
[INFO] Results:
[INFO]
[INFO] Tests run: 1, Failures: 0, Errors: 0, Skipped: 0
[INFO]
[INFO] ------------------------------------------------------------------------
[INFO] BUILD SUCCESS
[INFO] ------------------------------------------------------------------------
[INFO] Total time:  19.621 s
[INFO] Finished at: 2023-03-09T22:13:53+03:00
[INFO] ------------------------------------------------------------------------
This confirms that NotificationConsumer works successfully and is able to consume notification messages.
Congratulations! You have added two tests that use Testcontainers to spin up a Kafka instance and successfully validated the consuming or producing mechanisms of the applications works.
Conclusion
In this article, you learned how to test a Kafka integration in a Java application and a Spring Boot application by using Testcontainers and its Kafka Containers module.
When you apply this tutorial’s principles to a real-life situation, you can take it further by adding more test cases. You could also start refactoring your app or adding new features more reliably with the test that you’ve written.
As an alternative to a local Docker environment, AtomicJar also provides a cloud-based system called Testcontainers Cloud where you can easily run your tests reliably from any platform or any operating system. Check out Testcontainers Cloud by AtomicJar.
by Aykut Bulgu
Aykut Bulgu has 15+ years of experience working as a software engineer, consultant, trainer, and technical content architect. He has worked on many enterprise projects—mainly Java— nd has expertise in JBoss middleware. He’s an expert on Apache Kafka, Apache Camel, Kubernetes/OpenShift, and Strimzi (Kafka on Kubernetes). He helps organizations with technical content development and training via System Craftsman.
